Install Harness Delegate 2.0 (Closed Beta)
Delegate 2.0 is currently in closed beta, and is available for select customers only. Access is determined by the product team, and is based on current supported use cases and steps.
This guide describes how to install the new Harness Delegate to local machines. Skip to the End to End Demo if you want to watch video instructions for the new delegate installation.
Harness Delegate 2.0 is under Beta and can only be used for Mac Build, Android Build, and CI Stage Pipelines with limited sets of steps and connector support.
What's Supported
Supported Connectors
| Connector | Caveats |
|---|---|
| Docker Registry | Only the DockerHub provider type |
| Github | Does not work with Github App OAuth. |
| HashiCorp Vault | Only AppRole and Token Auth; set Renewal Interval to 0 (zero) |
| AWS Secrets Manager | Only Access Key and IAM Role Credential Type |
Supported CI Steps
| Step Name | Caveats |
|---|---|
| Git Clone | Only for Github |
| Run |
Delegate Installation Instructions
Quick Reference
| Command | Description |
|---|---|
./delegate install | Install and register the service |
./delegate start | Start the delegate service |
./delegate stop | Stop the service gracefully |
./delegate status | Show delegate status and details |
./delegate uninstall | Uninstall service (preserves config/logs) |
Important file locations:
| OS | Config File | Logs | Service Definition |
|---|---|---|---|
| MacOS | ~/.harness-delegate/config.env | ~/.harness-delegate/logs/ | ~/Library/LaunchAgents/harness-delegate.plist |
| Linux | ./config.env | ./nohup-delegate.out | N/A (runs in foreground/background) |
| Windows | C:\HarnessDelegate\config.env | C:\HarnessDelegate\logs\ | Windows Service Control Manager |
Get Harness Credentials
Before installation, obtain your Account ID, Delegate Token, and Harness URL:
- Interactive Guide
- Step-by-Step
-
In the left nav, click Project Settings.
-
Under Project-level Resources, click Delegates.
-
Click + New Delegate.
-
Choose Docker as your delegate type.
-
Copy the values from the
docker runcommand:ACCOUNT_ID→ Your Account IDDELEGATE_TOKEN→ Your Delegate TokenMANAGER_HOST_AND_PORT→ Your Harness URL
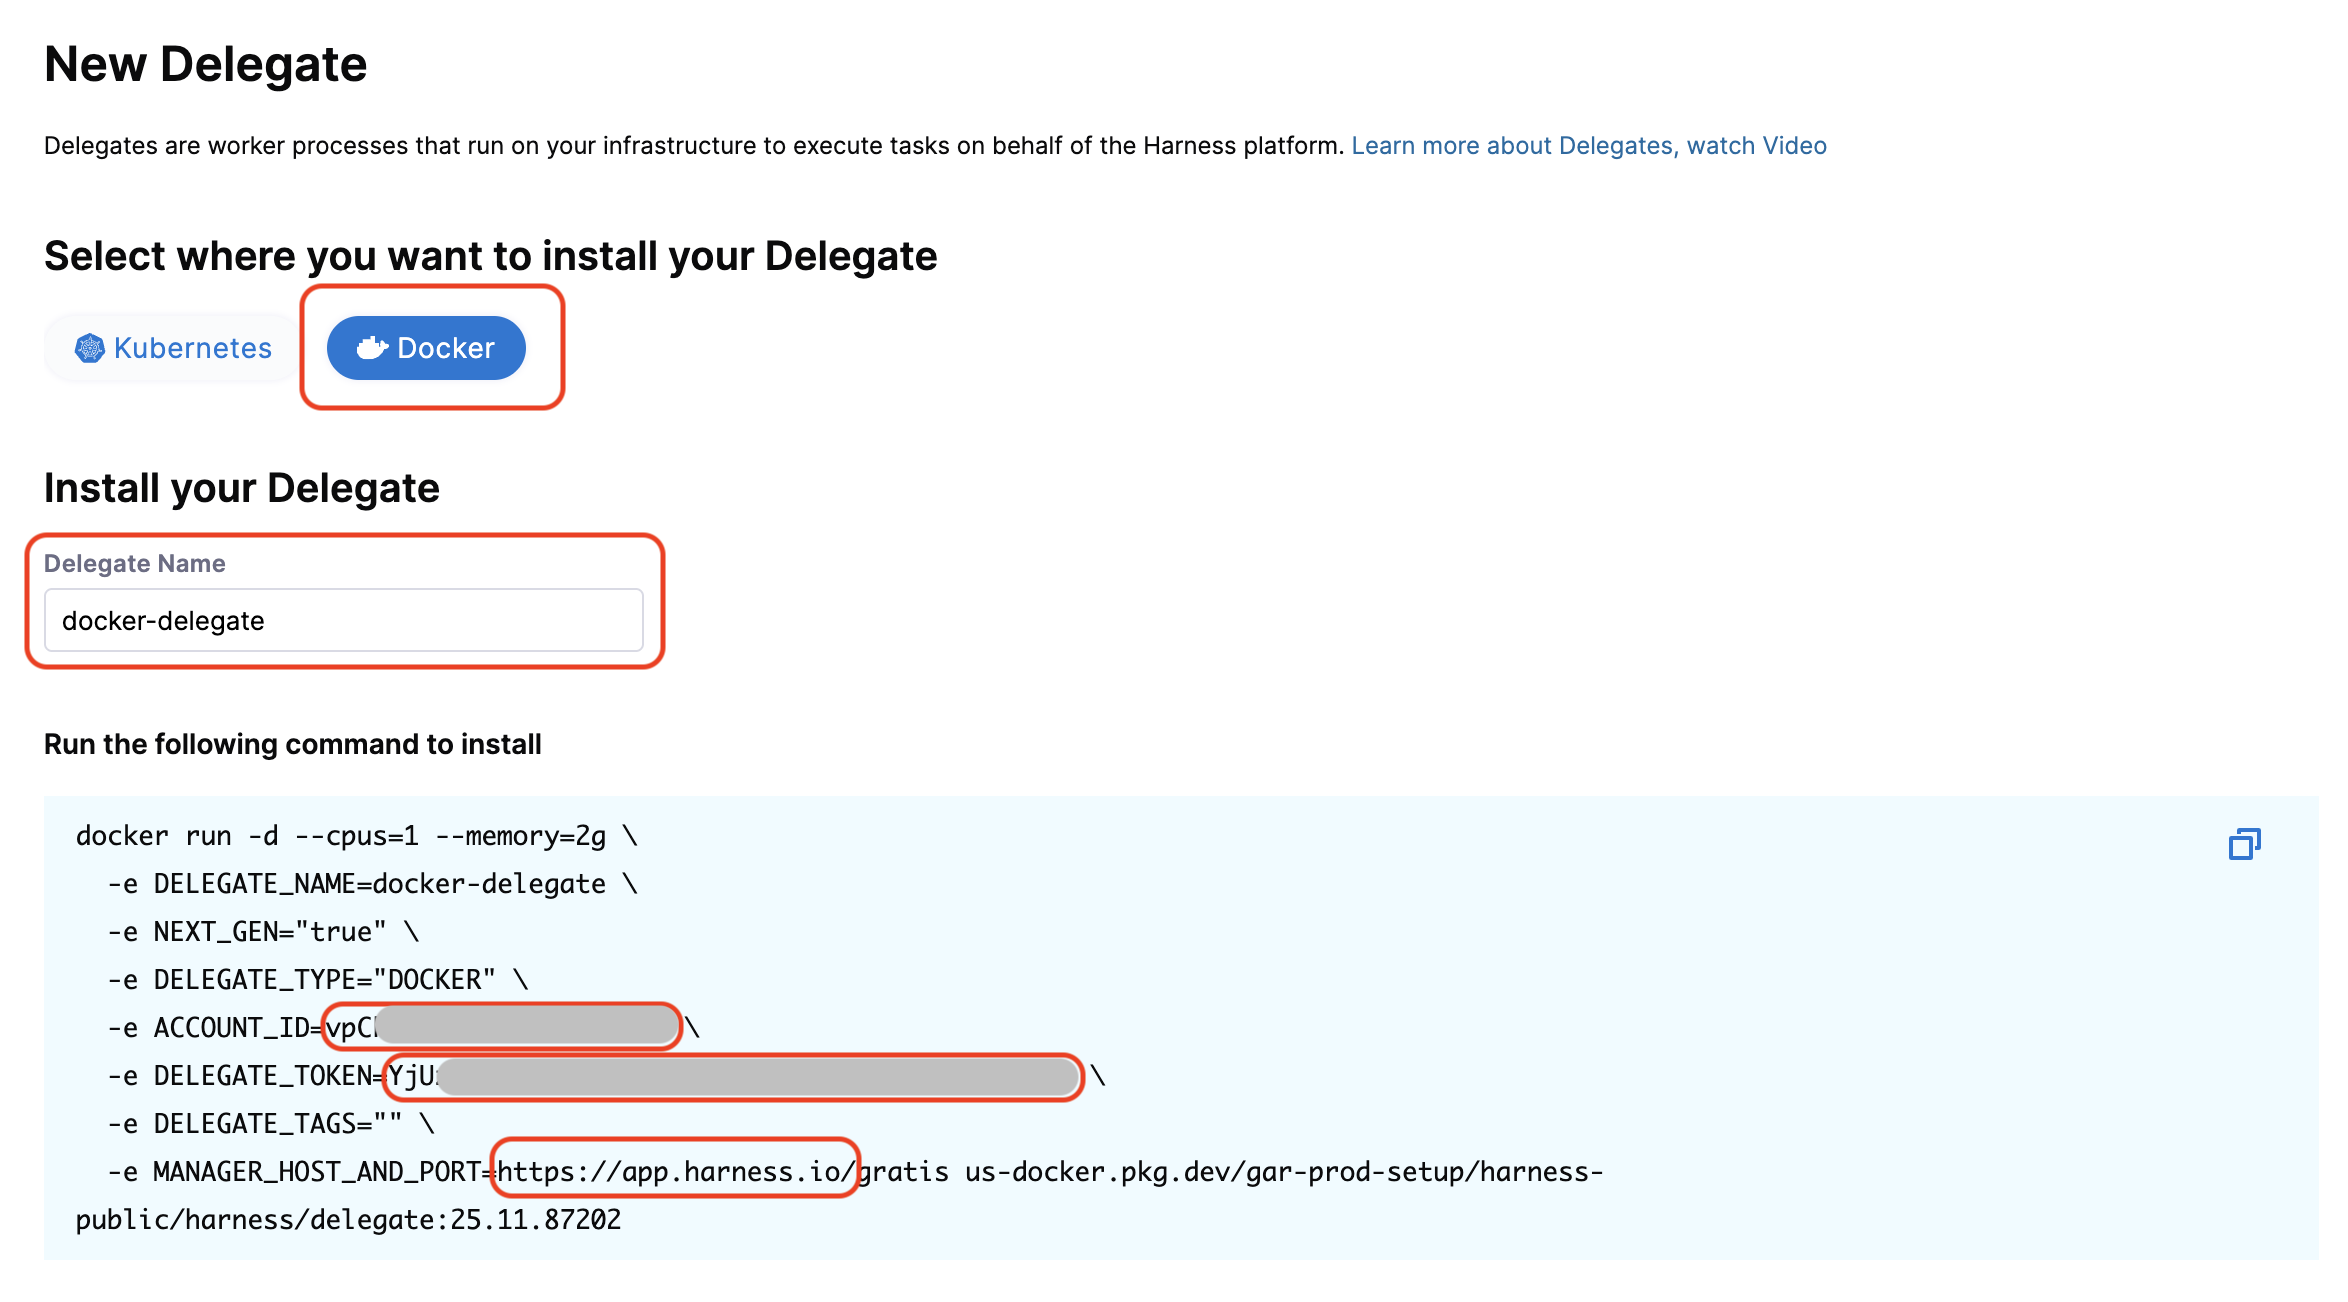
Keep these values ready - you'll use them in the installation command.
Download and Install the Delegate
Download and install the correct binary for your OS.
- MacOS
- Linux
- Windows
The delegate runs as a user service (LaunchAgent), not a system service. It only runs when you're logged in. Enable auto-login (see step 5) to ensure it starts after system reboots.
-
Download the delegate binary
Replace
<VERSION>with the latest version (e.g.,1.28.0):For arm64 (Apple Silicon):
curl -L "https://app.harness.io/public/shared/delegates/<VERSION>/delegate-darwin-arm64" -o delegate
chmod +x delegate
For amd64 (Intel):
curl -L "https://app.harness.io/public/shared/delegates/<VERSION>/delegate-darwin-amd64" -o delegate
chmod +x delegate
Example using version 1.28.0:
curl -L "https://app.harness.io/public/shared/delegates/1.28.0/delegate-darwin-arm64" -o delegate -
Install the delegate with your credentials
Run the install command with the credentials you obtained from the previous step:
./delegate install --account=[Your Account ID] \
                   --token=[Your Delegate Token] \
                   --url=[Your Harness URL] \
--name=[Your Delegate Name]infoIf you don't specify a name, the delegate will default to
harness-delegate.Optional: Add tags for delegate selection
Tags are optional but useful for routing specific pipelines to this delegate:
./delegate install --account=[Your Account ID] \
                   --token=[Your Delegate Token] \
                   --url=[Your Harness URL] \
                   --name=[Your Delegate Name] \
                   --tags="production,macos"
View all available installation options
./delegate install --helpAvailable options:
--account- Your Harness account ID (required)--token- Delegate authentication token (required)--url- Harness server URL (required)--name- Custom delegate name (default:harness-delegate)--tags- Comma-separated tags for delegate selection (optional)--env-file- Path to config file (default:~/.harness-delegate/config.env)--graceful-exit-timeout- Shutdown timeout in seconds (default: 300)--auto-restart-on-failure- Auto-restart on failure (default: true)
What this command creates:
- Workspace directory:
~/.harness-delegate - Configuration file:
~/.harness-delegate/config.env - LaunchAgent service:
~/Library/LaunchAgents/harness-delegate.plist
-
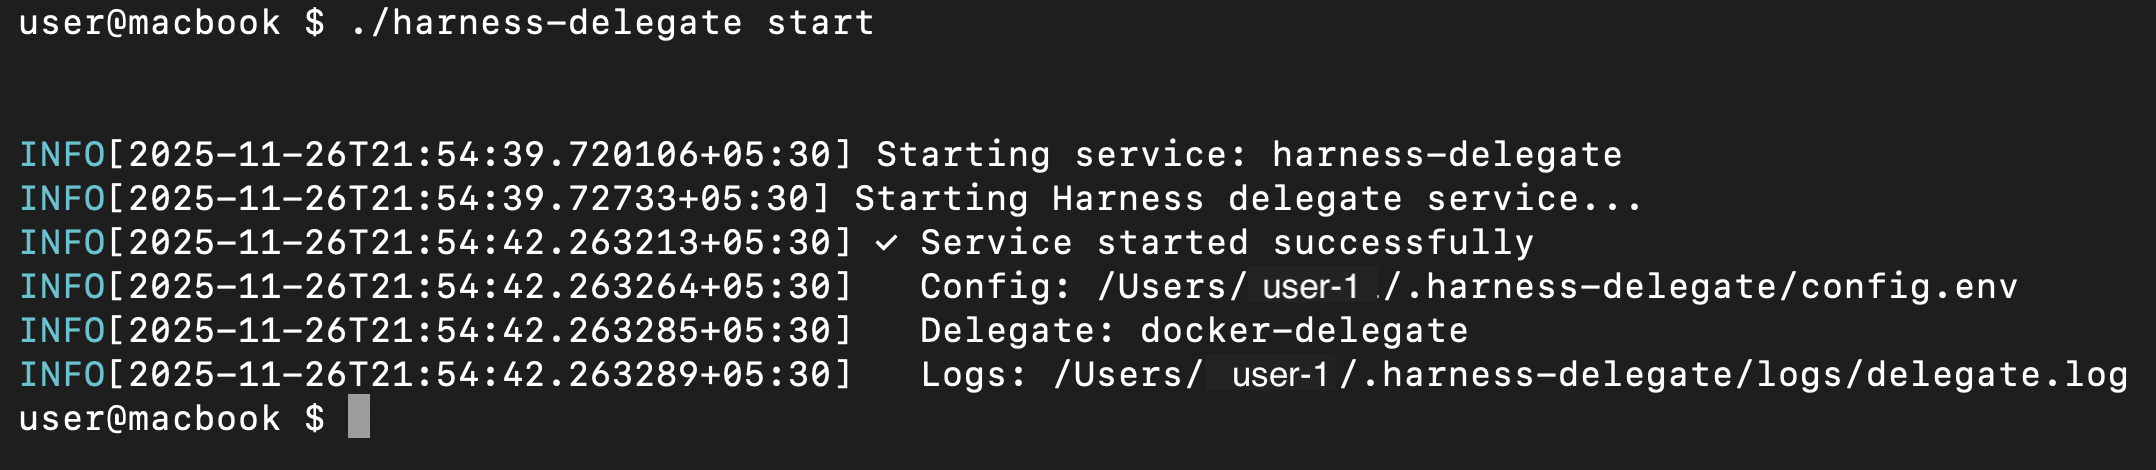
Start the delegate service
./delegate startYou should see a success message with the config location and log file path.
-
Verify the delegate is running
Check the status:
./delegate status
View logs in real-time:
tail -f ~/.harness-delegate/logs/delegate.logNavigate to Project Settings > Delegates in Harness UI. You should see your delegate with a Connected status.

-
Enable auto-login (Recommended)
Since the delegate runs as a user service, enable auto-login to ensure it starts after system reboots:
- Open System Settings (or System Preferences on older macOS)
- Go to Users & Groups
- Click the lock icon and authenticate
- Select Login Options
- Set Automatic login to your user account
Additional Configuration
Update delegate settings:
- Stop the service:
./delegate stop - Edit the config:
nano ~/.harness-delegate/config.env - Start the service:
./delegate start
Proxy configuration:
If you need proxy settings, add them to ~/.harness-delegate/config.env. See Configure Delegate Proxy Settings.
Manual plugin installation:
Some CI steps can run directly on the host. Harness automatically downloads required plugins, but manual installation is needed when your infrastructure lacks internet connectivity (e.g., behind a proxy or firewall).
To manually install a plugin:
- Download the plugin from its source (e.g., drone-git v1.7.6)
- Decompress:
zstd -d plugin-darwin-arm64.zst(orplugin-darwin-amd64.zstfor Intel) - Move to plugins directory:
mkdir -p ~/.harness-delegate/default/plugin/drone-git/
mv plugin-darwin-* ~/.harness-delegate/default/plugin/drone-git/
chmod +x ~/.harness-delegate/default/plugin/drone-git/plugin-darwin-*
Manage the Delegate
Stop: ./delegate stop - Gracefully shuts down (waits up to 5 minutes for tasks to complete)
Uninstall: ./delegate uninstall - Removes service registration (preserves config, logs, and binary)
Upgrade:
- Download new binary (replace existing
delegatefile) ./delegate stop./delegate start
-
Download the delegate binary
For arm64:
curl -L "https://app.harness.io/public/shared/delegates/1.28.0/delegate-linux-arm64" -o delegate
chmod +x delegate
For amd64:
curl -L "https://app.harness.io/public/shared/delegates/1.28.0/delegate-linux-amd64" -o delegate
chmod +x delegate -
Create configuration file
Create a
config.envfile with the credentials you obtained from the previous step:cat > config.env <<EOF
HARNESS_ACCOUNT_ID="[Your Account ID]"
HARNESS_TOKEN="[Your Delegate Token]"
HARNESS_URL="[Your Harness URL]"
HARNESS_NAME="[Your Delegate Name]"
EOFinfoIf you don't specify
HARNESS_NAME, the delegate will default toharness-delegate.Optional: Add tags
Tags are optional but useful for routing specific pipelines:
cat > config.env <<EOF
HARNESS_ACCOUNT_ID="[Your Account ID]"
HARNESS_TOKEN="[Your Delegate Token]"
HARNESS_URL="[Your Harness URL]"
HARNESS_NAME="[Your Delegate Name]"
HARNESS_TAGS="production,linux"
EOF -
Start the delegate
Run in the background:
nohup ./delegate server --env-file config.env > nohup-delegate.out 2>&1 & -
Verify the delegate is running
Check the logs:
tail -f nohup-delegate.outNavigate to Project Settings > Delegates in Harness UI. You should see your delegate with a Connected status.
Additional Configuration
Proxy configuration:
If you need proxy settings, add them to config.env. See Configure Delegate Proxy Settings.
Manual plugin installation:
Some CI steps can run directly on the host. Harness automatically downloads required plugins, but manual installation is needed when your infrastructure lacks internet connectivity (e.g., behind a proxy or firewall).
To manually install a plugin:
- Download the plugin from its source (e.g., drone-git v1.7.6)
- Decompress:
zstd -d plugin-linux-arm64.zst(orplugin-linux-amd64.zst) - Move to plugins directory:
mkdir -p ./default/plugin/drone-git/
mv plugin-linux-* ./default/plugin/drone-git/
chmod +x ./default/plugin/drone-git/plugin-linux-*
Manage the Delegate
Stop: Find and kill the process using ps and kill commands
Upgrade:
- Download new binary (replace existing
delegatefile) - Kill the existing process
- Start with the command from step 3
The delegate runs under the LocalSystem account.
-
Download the delegate binary
Open PowerShell as Administrator:
- Press Windows Key + X
- Select "Windows PowerShell (Admin)" or "Terminal (Admin)"
Replace
<VERSION>with the latest version (e.g.,1.28.0):Invoke-WebRequest -Uri "https://app.harness.io/public/shared/delegates/<VERSION>/delegate-windows-amd64.exe" -o delegatenoteIn Command Prompt, use:
curl -L "https://app.harness.io/public/shared/delegates/<VERSION>/delegate-windows-amd64.exe" -o delegate -
Install the delegate with your credentials
Run the install command with the credentials you obtained from the previous step:
.\delegate install --account=[Your Account ID] `
                       --token=[Your Delegate Token] `
                       --url=[Your Harness URL] `
--name=[Your Delegate Name]infoIf you don't specify a name, the delegate will default to
harness-delegate.Optional: Add tags for delegate selection
Tags are optional but useful for routing specific pipelines to this delegate:
.\delegate install --account=[Your Account ID] `
                  --token=[Your Delegate Token] `
                  --url=[Your Harness URL] `
                  --name=[Your Delegate Name] `
                  --tags="production,windows"
View all available installation options
.\delegate install --helpAvailable options:
--account- Your Harness account ID (required)--token- Delegate authentication token (required)--url- Harness server URL (required)--name- Custom delegate name (default:harness-delegate)--tags- Comma-separated tags for delegate selection (optional)--env-file- Path to config file (default:C:\HarnessDelegate\config.env)--auto-restart-on-failure- Auto-restart on failure (default: true)
What this command creates:
- Workspace directory:
C:\HarnessDelegate - Configuration file:
C:\HarnessDelegate\config.env - Windows service registered in Service Control Manager
-
Start the delegate service
.\delegate startYou should see a success message with the config location and log file path.
-
Verify the delegate is running
Check the status:
.\delegate statusOr use Windows native commands:
Get-Service "harness-delegate"View logs in real-time:
Get-Content -Path "C:\HarnessDelegate\logs\delegate.log" -Tail 10 -WaitNavigate to Project Settings > Delegates in Harness UI. You should see your delegate with a Connected status.
Additional Configuration
Update delegate settings:
- Stop the service:
.\delegate stop - Edit the config:
notepad C:\HarnessDelegate\config.env - Start the service:
.\delegate start
Proxy configuration:
If you need proxy settings, add them to C:\HarnessDelegate\config.env. See Configure Delegate Proxy Settings.
Manual plugin installation:
Some CI steps can run directly on the host. Harness automatically downloads required plugins, but manual installation is needed when your infrastructure lacks internet connectivity (e.g., behind a proxy or firewall).
To manually install a plugin:
- Download the plugin from its source (e.g., drone-git v1.7.6)
- Decompress:
zstd.exe -d plugin-windows-amd64.zst -o plugin-windows-amd64.exe - Move to plugins directory:
New-Item -ItemType Directory -Force -Path "C:\HarnessDelegate\default\plugin\drone-git\"
Move-Item plugin-windows-amd64.exe "C:\HarnessDelegate\default\plugin\drone-git\"
Manage the Delegate
Stop: .\delegate stop - The service will auto-start on system reboot
Uninstall: .\delegate uninstall - Removes service registration (preserves config, logs, and binary)
Upgrade:
- Download new binary (replace existing
delegatefile) .\delegate stop.\delegate start
Navigate to Project Settings > Delegates. You should see your new delegate in the delegates list.
If you don't set a name for your delegate, it will default to harness-delegate
Configure Pipeline Delegate
For the CI stages that you want to use the new delegate with, define the stage variable HARNESS_CI_INTERNAL_ROUTE_TO_RUNNER and set it to true.
Then, in order for the pipeline to select this delegate, set your pipeline's build infrastructure as normal.
Most importantly, ensure that you have set Local as the Infrastructure and that the Operating System and Architecture match the delegate you installed in the download and install delegate step.
Delegate Configuration
The config.env file location:
- macOS:
- Default:
~/.harness-delegate/config.env - Custom workdir:
{workdir}/config.env
- Default:
- Linux:
- Default: Location where you created it
- Custom workdir:
{workdir}/config.env
- Windows:
- Default:
C:\HarnessDelegate\config.env - Custom workdir:
{workdir}/config.env
- Default:
Set Max Stage Capacity
With Harness Delegate 2.0, you can configure a limit for the maximum number of stages the delegate will be executing at a given time. When the delegate is handling tasks at full capacity, new tasks will be queued and picked up once the delegate's capacity is freed.
In order to configure a max limit for number of stages executed by a delegate, you should add a MAX_STAGES variable in the delegate's config.env file. The value of the MAX_STAGES should be a positive integer.
Example config.env
If you wanted the delegate to only execute up to 5 stages a time, set MAX_STAGES=5. For example:
ACCOUNT_ID="<ACCOUNT_ID>"
TOKEN="<DELEGATE_TOKEN>"
TAGS="<your delegate tags>"
URL="<MANAGER_HOST_AND_PORT>"
NAME="<your delegate name>"
...
MAX_STAGES=5
Set Graceful Shutdown
With Harness Delegate 2.0, you can configure a grace period to allow for a clean shutdown of running containers and processes when a pipeline execution is aborted. This ensures that any resources started by the pipeline are given time to terminate gracefully before being forcefully removed.
To configure this grace period, add the CLEANUP_GRACE_PERIOD_SECONDS variable to the delegate's config.env file. The value should be a non-negative integer representing the number of seconds to wait before forcefully terminating resources.
If the grace period is set to 0 (default), the delegate will immediately send a SIGKILL signal to stop containers and processes. If a positive value is configured, the delegate will first send a SIGTERM signal. After the grace period expires, any resources that are still running will be terminated with a SIGKILL.
Example config.env
If you want the delegate to wait up to 30 seconds before forcefully stopping any running containers or processes, set CLEANUP_GRACE_PERIOD_SECONDS=30. For example:
ACCOUNT_ID="<ACCOUNT_ID>"
TOKEN="<DELEGATE_TOKEN>"
TAGS="<your delegate tags>"
URL="<MANAGER_HOST_AND_PORT>"
NAME="<your delegate name>"
...
CLEANUP_GRACE_PERIOD_SECONDS=30
Configure Custom Working Directory
By default, the delegate stores its configuration files, logs, and cache in a standard location. You can customize this location using the HARNESS_WORKDIR variable.
Default locations:
- Windows:
C:\HarnessDelegate - Linux/macOS:
~/.harness-delegate
How to configure:
- Service Installation
- Direct Binary Execution
Use the --workdir flag during installation:
./delegate install --account=[Account ID] \
                   --token=[Delegate Token] \
                   --url=[Harness URL] \
                   --name=[Your Delegate Name] \
                   --workdir=/custom/path/to/workdir
Set the HARNESS_WORKDIR environment variable before running the binary:
Linux/macOS:
export HARNESS_WORKDIR=/custom/path/to/workdir
./delegate server --env-file config.env
Windows (PowerShell):
$env:HARNESS_WORKDIR="C:\custom\path\to\workdir"
.\delegate server --env-file config.env
Notes:
- The delegate automatically creates the directory and subdirectories. Ensure the delegate process has read/write permissions for this directory.
Debugging
Logs
You can find the delegate logs in the following locations:
- macOS:
- Default:
~/.harness-delegate/logs/delegate.log - Custom workdir:
{workdir}/logs/delegate.log
- Default:
- Linux:
- Default:
nohup-delegate.out - Custom workdir:
{workdir}/logs/delegate.log
- Default:
- Windows:
- Default:
C:\HarnessDelegate\logs\delegate.log - Custom workdir:
{workdir}/logs/delegate.log
- Default:
Log File Configuration
The delegate supports automatic log rotation and sanitization. Configure these using environment variables in your config.env:
# Enable/disable file logging
LOG_ENABLE_FILE_LOGGING=true


# Log rotation settings
LOG_MAX_SIZE_MB=100        # Rotate at 100MB
LOG_MAX_BACKUPS=3          # Keep 3 old files
LOG_MAX_AGE_DAYS=28        # Delete after 28 days
LOG_COMPRESS=false         # Compress rotated logs
View logs in real-time:
MacOS:
tail -f ~/.harness-delegate/logs/delegate.log
Linux:
tail -f nohup-delegate.out
Windows:
Get-Content -Path "C:\HarnessDelegate\logs\delegate.log" -Tail 20 -Wait
Metrics
Delegate 2.0 exposes metrics on the /metrics endpoint for monitoring and observability. By default, the metrics endpoint is available at http://localhost:3000/metrics.
End to End Demo
This video walks through an end to end demo of the delegate installation, including usage and a pipeline execution.